
Since the same questions come up again and again in the Discord, we would like to provide simple and uncomplicated answers here.
Here are two methods to find the community folder:
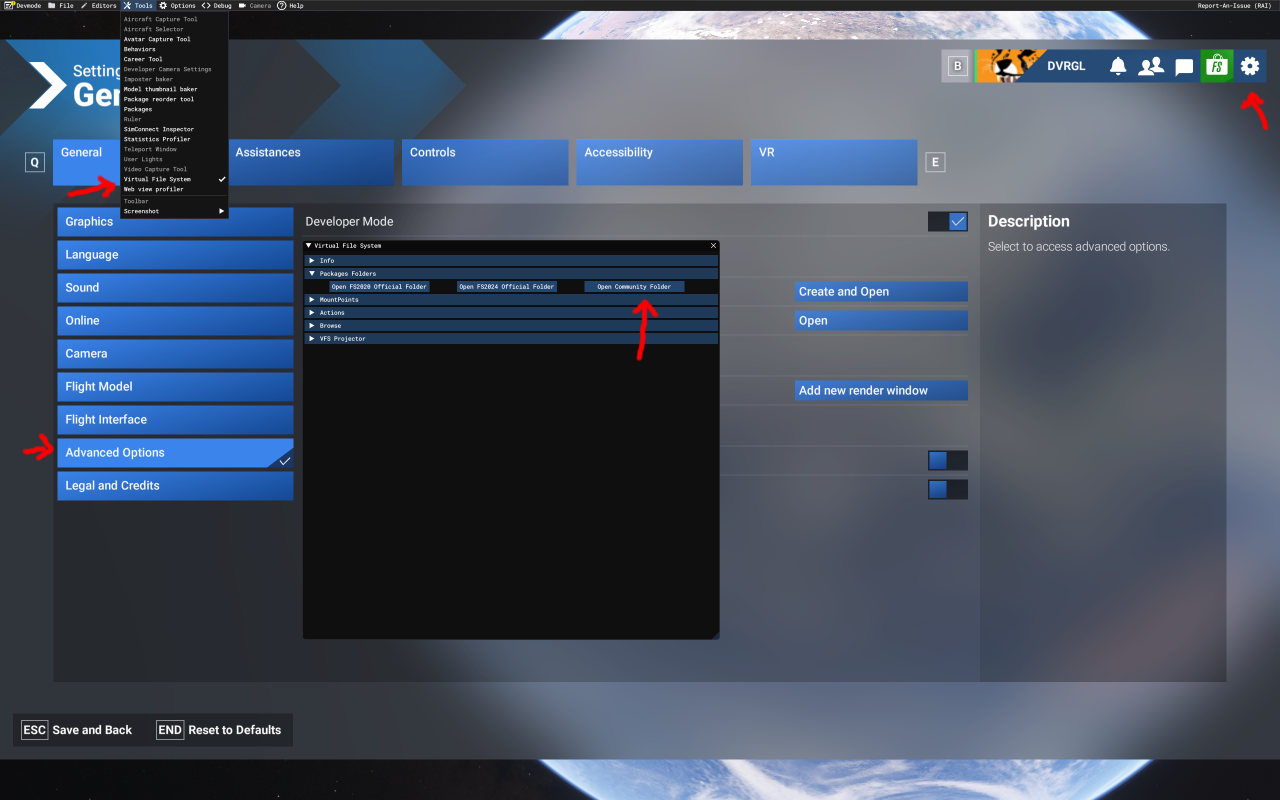
Launch Microsoft Flight Simulator
Go to Options → General Options
Enable Developer Mode by clicking on the Developers tab and setting Developer Mode to On
In the new menu bar at the top of the screen, click Tools → Virtual File System
Expand "Packages Folders"
Click "Open Community Folder"
This method works regardless of how you installed MSFS and is the most reliable way to locate the correct folder
In the settings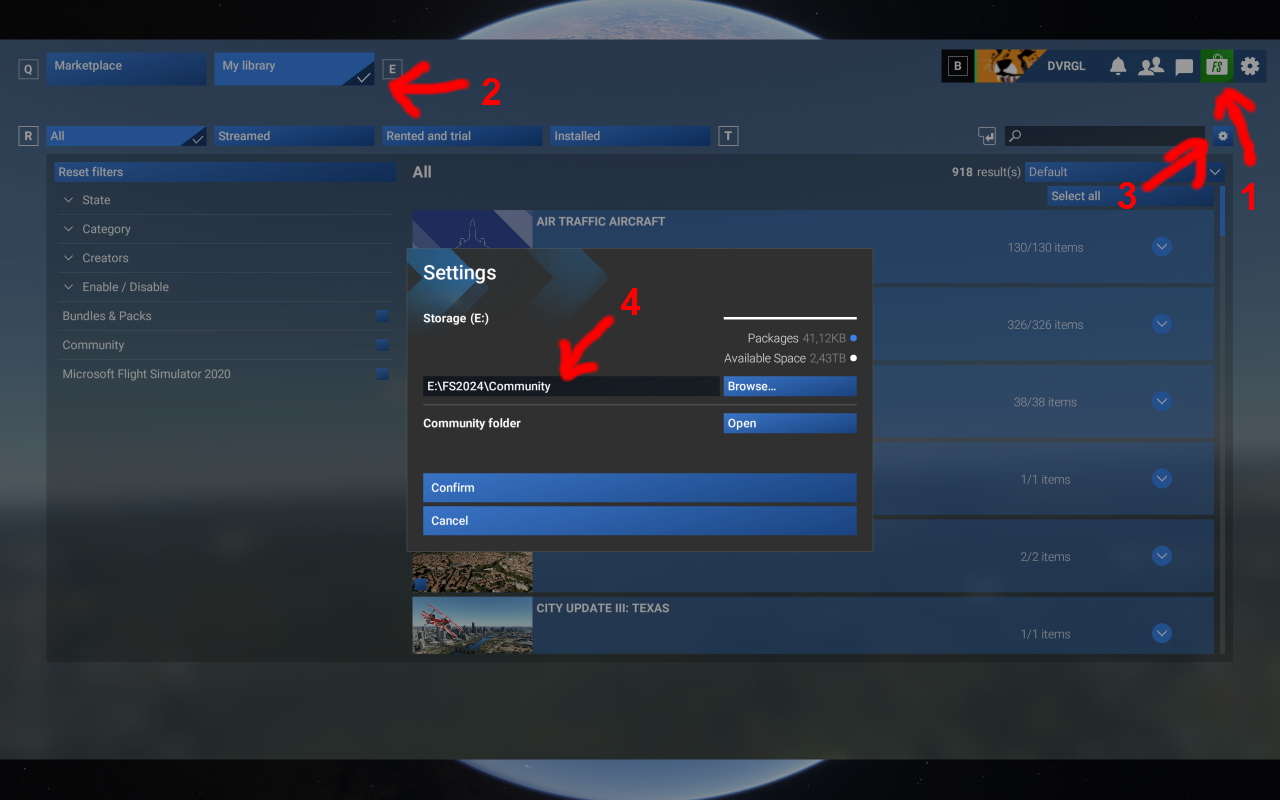
Start Microsoft Flight Simulator
Click on the Marketplace at the top right
Click on "My Libary" at the top left
Click on the cogwheel on the right
In the settings you will find or can set the folder
Close MSFS 2024
Download MSFSLayoutgenerator.exe from GitHub: https://github.com/HughesMDflyer4/MSFSLayoutGenerator/releases/tag/v1.1.1
Locate your Community folder
Drag the layout.json file from the hpg-airbus-h160 directory onto the downloaded .exe file
https://github.com/HughesMDflyer4/MSFSLayoutGenerator/releases/tag/v1.1.1
Close MSFS.
Download this app, place file on desktop (don’t open or run it, just place it).
Find layout.json in your hpg -airbus-h160 folder.
Click and drag this .json file right on top of the layoutgenerator and release.
You’ll see a window open and close, and that’s it… your done
restart msfs and enjoy your flight
None:
This means that your stick is always active but you should use Trim Release to really take control otherwise the AFCS will be fighting you the entire time. Note that in
this setting, L:FFB_HANDS_ON_CYCLIC or L:FFB_HANDS_ON_CYCLICY/L:FFB_HANDS_ON_CYCLICX can be used to provide CSAS signal.
Motion Rate
This uses motion rate detection (with a slider to adjust sensitivity). When you move the stick it goes into CSAS modes automatically, which is similar to using trim
release and more like the 1.0 flight model
Deadzone
This is the traditional deadzone that has been an option for a long time.
Ignore
This is the old AFCS Override: AP Only setting, where your stick is ignored unless you press Trim Release. This is good for people without friction locks or
apeople who bsolutely demand it works like the Asobo autopilot.
The understanding and correct use of trim release always is a problem. FireHawk wrote a short explanation in the Discord H160_discussion. This is for
the H145 correct too.
When your Automated Flight Control System (AFCS) is turned on (all “OFF” indicators not showing on the AFCS panel) this is what’s called Attitude
Mode (ATT). In ATT, the aircraft will always want to hold pitch and roll axis (nose up/down and roll right/left) where you last left them when, basically,
you take you hands off the stick. So, let’s say you’re hands off, flying 120kts, straight-n-level. You see some birds ahead, so you grab the cyclic and roll
right to avoid them. When you release the stick, it will roll left back to level on its own. Same for pitch.
Now, doing the same exercise, S-n-L, 120kts, except this time press and hold Trim Release (TR) while you roll right. When you’re banked over, release
TR and the cyclic and now the aircraft will hold that bank angle (that Attitude). So wherever your nose is pointed or tilted, if you move the stick, the
aircraft will ‘rubber-band’ right back to where it was. Press TR, move the stick, release TR and now you’ve centered the rubber bands (as it were).
Also, Force Trim Release is NOT the same as Beep Trim. Beep Trim lets you move those ATT set points small ‘beeps’ at a time
Beep Trim functions kinda similar to a fixed-wing elevator or aileron trim system in feel (but is a different function mechanically).
One source of problems is the correct setting and application of Trim Release button. Dave described this as follows in the H145 discussion forum:
The types of cyclic controls are:
Spring joystick (centering spring)
• no-spring helicopter controls (friction lock available). may or may not have light spring forces.
• no-spring helicopter controls (friction lock NOT available)
• Keyboard or controller buttons. This is difficult and rare.
• Full FFB cyclic. This is pretty rare.
In every case below you'll want to use zero deadzone in MSFS settings.
spring joystick:
Cyclic trim system: software (default setting)
HANDS ON detection strategy: deadzone (default setting)
Follow-up trim: HOVER or BOTH (default setting)
In this configuration you'll have the virtual trim (blue cross) constantly moving to relax your stick position. It's slow so it shouldn't bother you, but it means no matter if
you are in cruise or in hover, the stick will slowly relax so you are at zero forces.
Follow-up trim should either be in HOVER or BOTH modes. When you are in ATT mode (blank on the MFD) you can bump the stick and have either "fly back to
previous setpoints" or it can "sync to current" to where the aircraft ends up. Follow-up trim depends on HANDS ON detection strategy. The real aircraft will use
HOVER only. (Helionix V10 adds TAC mode which is a follow-up trim for cruise).
IMPORTANT: The deadzone strategy for detecting HANDS ON means we expect your stick to reliably re-center itself and you should set a deadzone which is large
enough such that you don't have spurious HANDS ON events when you actually are not manipulating the stick.
You have the option (not recommended) of using the DCS-style center-displacement binding. You'll need to switch the cyclic trim system is on hardware as it would
compete with the displacement binding.
Add a control binding for MAGNETO 2 START (default binding)
When your control is in a desirable position. click the binding
Your cyclic is now disocnnected. Within the Center displace reset time setting time, you must return your stick to a center position.
Your controls will now be reconnected, but you moved them into the neutral position, so there is no change in output since step 2.
This strategy of updating the center position is common on other sims like DCS or the xplane rotorsim EC135, although we believe the Trim Release strategy works
better without interruption to the controls.
no-spring or helicopter cyclic:
Cyclic trim system: Hardware
Follow-up trim: BOTH
Friction Lock available:
HANDS ON detection strategy: Motion
Friction Lock not available:
HANDS ON detection strategy: Ignore
The cyclic virtual trim will not be available, which means your stick is always directly connected to the helicopter output without an offset provided by the trim. As a
consequence you'll need to deflect your stick forward in cruise as with any other helicopter. You can enable the software trim system and make use of the virtual
trim if you prefer.
Motion HANDS ON detection strategy is necessary for HANDS ON detection because the deadzone is unlikely to be usable due to lack of a centering force.
If you can return your stick reliably to the center, you may like to use the centering-spring settings entirely. If the Motion strategy doesn't work well for you, then
NONE could be used, along with heavy Trim Release use.
If your control cannot be parked in a position, you'll not be able to use the AFCS unless you use the Ignore strategy for HANDS on detection. Using the Ignore mode
means that your stick position will be completely ignored except when you use Trim Release. By this method you may use beep trim and UPPER MODES, while
cyclic is deflected to one corner or in any position.
your Follow-up trim is recommended to be on the BOTH setting to avoid the AFCS fighting you. Since your stick is always directly connected, your hand holding it would
prevent fly-back behavior and as such it's probably better to just avoid the AFCS trying to fly back regardless.
Force Feedback cyclic:
Cyclic trim system: Hardware
Follow-up trim: BOTH
HANDS ON detection strategy: None
FFB controllers will monitor SEMA L:Vars and drive trim motors to de-saturate them, so virtual trim must be disabled.
Follow-up trim should be on BOTH for the reasons mentioned above around avoiding AFCS fly-back.
HANDS ON detection strategy should be None to disable built-in CSAS modes. CSAS detection signal must be provided by L:Var. If you cannot provided
CSAS signal then Trim Release should be used.